You want water in your map, im here to show you how. There are two methods to creating water. As far as I am aware they both produce the same effect and the only difference is how you make them. I will take you through them one at a time, so....
Method 1 - Using sheets
1. Make your pool.
You need somewhere for your water to go, so make yourself a little empty pool or river.
(I suggest a pool, its easier for learning.)
2. Create your sheet.
The sheet has to be big enough to cover your pool/river, the sheet is effectively the
waters surface. Make sure you check the "Floor/Ceiling" box and you have the right size
brush (Its important).
Now move the sheet to where the waters surface will be, you get more realism if you put the sheet below the edge of the pool/river. it will look weird with it right at the top, water doesnt do that in real life does it?
3. Adding the sheet.
For a water texture, the defaults are found in CoreTexWater so load that up and select one of
those. (You dont have to add the texture now, you can add it later like you would a normal
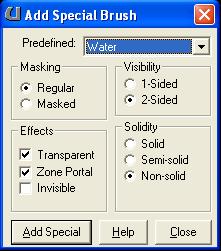
surface. Right click the "Add Special Brush" button and click "Add Special Brush" Then you are
confronted with this box.
4. Add Water zone.
In the classes browser, follow this route... Actor > Info > ZoneInfo > WaterZone. With "WaterZone"
selected add it into your map through right click "Add WaterZone here. Then, if it isnt already,
move it so its inside where the water of your pool/river will be. Well done, you've created a water zone.
Method 2 - Not using sheets
1. Make your pool.
2. Create your brush.
This time we are going to use the regular brushes to create the water. so you could just use the same
size brush as you used to make your pool. It would make more realistic water if you used a smaller
brush (think about the water level). Make sure its in the right place.
3. Adding the water.
From now on it is pretty much the same as before so... Right click the "Add Special Brush" button and
click "Add Special Brush" Then you are again confronted with this box.
4. Add Water zone.
In the classes browser, follow the same route... Actor > Info > ZoneInfo > WaterZone. With "WaterZone"
selected add it into your map through right click "Add WaterZone here." Then, if it isnt already,
move it so its inside where the water of your pool will be. And then we are done, congratulations.
Now you know how to crete a water zone, both ways!
An example of something you can do to make the water a little more interesting. You can animate the water texture, just like you can any other. To liven it up a little, right-click on the water surface in the 3D view and select "Surface properties". Select either "Big Wavy" or "Small Wavy" on the Effects tab.
Thanks, Reaction