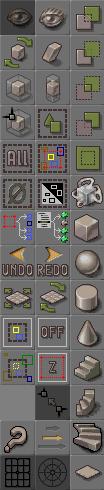
This tutorial is here to explain the basic buttons of UnrealEd.
I class the basic buttons as the buttons in the right hand collum of buttons, the more advanced buttons are the buttons in the first two collums.
Now lets get started....
 The Add Brush.
Use this brush to add things to the world
Try to remember that the Unreal engine starts as a big block, then you "carve" your level from that.... THEN ADD. Only add to a place that has been hollowed out using the subtract brush.
 The Subtract Brush
Use this brush to make rooms and accesable areas.
Again it is important to remember how the editor works, it starts with a big block and you carve from it then add to it.
 The Intersect Brush
The best use for this brush is for selecting everything that is solid inside the builder brushes.
Example; if you made a table out of 4 legs and a table top. Create a red builder block around the table, hit the intersect button and now all the seperate brushes have been moulded into one builder brush.
Another use for this tool is the creation of brushes that will become movers, since it also copies the textures on the brushes that are selected.
 The Deintersect Brush
This does the opposite to the intersect brush, it selects everything that is not solid. (The subtracted areas.)
 Add Special Brush
Special brushes can be used to add things like zones to your map.
 Add A Mover
Turns the brush into a mover.
See the movers tutorial here.
From now on in this tutorial, the following buttons manipulate the red builder brush.
 Build A Cube
Builds a cube, shocking ! :o
The cubes properties can be edited by right clicking the button and selecting, "cube properties".
 Build A Sphere
Builds a sphere, or as close as UnrealEd can get to one.
Makes the brush spherical, you can edit the sphere's properties in the same way as you can the cube's.
 Build A Cylinder
Make a cylinder
Use it to make any kind of cylinder, pipes, rooms, pillars. Anything. Again you can change its properties just like any other shape.
 Build A Cone
Turns the red brush into a cone shape.
There are plenty of options if you want to edit a cone. You can change the radius, change the height, you can cap it, you can change at what height the cap is. And more.
 Make Some Stairs
Builds a straight staircase.
Good old fashoined set of stairs. Not a lot of thrills here, but you can change the number of steps, the step height etc. Just like you can with all stair cases.
 Build Spiral Stairs
Makes a spiral stair case,
When editing the properties of a spiral stair case, you can calculate the height of the stairs using the editor.
 Build Curved Stairs
Turns the red brush into curved stairs.
Curved stairs have a flat base unlike spiral stairs.
 Make A Sheet
Creates a 2D sheet
Turns the brush into a 2D sheet as apposed to 3D. A sheet is most commonly used in zoning.
When editing the properties of the brush, try to use binary numbers. That is 2, 4, 8, 16, 32, 64, 128, 256, 512, 1024. If you do your maps will run alot more smoothly and have less errors to worry about fixing
Reaction